
Table of Contents
Introduction
Series I
Series II
Series III
Series IV
Interview with Product
"Famous Covers"
"First Appearances"
"Marvel Milestones"
"Avengers Assemble"
Designer Tom McCormack


|
Neck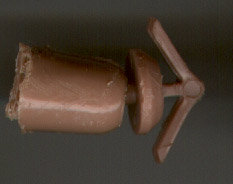
DESC: The necks are fairly simple ball and socket joints. The
neck is part of the chest piece but there is also a small plastic
piece that goes between the head and neck (see above). The neck
joint is a disc with an arrowhead on top (which is different from
the wrist arrows) and has a bulb attached to the bottom for the
ball and socket joint. The neck on the upper chest piece is simply
a socket which the bulb snaps into. The design allows some tilting
as well as a complete twist of the head.
REM: While attempting to remove the neck joint from the upper
chest the plastic on it started to neck (i.e. turned white from
stress) so I stopped. Since both the neck and the upper chest
are brittle plastic, the neck will not come out very easily. I
have suggestions for removing it, but you may not be able to do
so without damaging the joint beyond repair. The neck is easiest
to remove if the head has been removed (see next section). If
the head has been removed, get a strong grip in the body and neck
parts and simply pull them apart. The neck will snap out of the
socket. If the chest was opened and the neck was opened as well
then the bulb will easily slide out the side of the two halves.
If you want to remove the neck while the head is still attached,
then you'll have to find some way to get hold of it without damaging
the head. I haven't removed the neck in this fashion, so I have
no good suggestions.
REST: Simply snap the neck bulb back into the socket it once occupied.
Head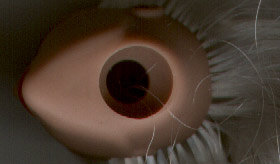
DESC: At last, the final piece of the figure! The head is made
of very soft and pliable plastic and depending on the character
may have rooted hair. The bottom of the head has a small concave
depression with a hole through which the neck joint is connected
(see above). The head is probably the most likely piece to be
removed and replaced, and since the construction is similar to
that of Barbie and other fashion dolls, we'll be using the same
methods to remove and replace the head.
REM: To remove the head we can take a page from Barbie customizers
since the design is similar. A good way to start is to heat up
the head to make it a little softer and more pliable (which will
help getting it off). A hair blow dryer can be used to blow hot
air on the head without causing damage to it, just don't put it
too close to the dryer! You don't have to heat it, but it helps
soften the plastic. Then you want to try and pry a small, long
screwdriver (or other small, thin device that can be used as a
lever) into the small opening where the head attaches to the neck.
You will have to pull the head up and away from the neck in order
to get good access to the hole. Once inside you can use it to
pry the head off of the arrow (from the neck). Be careful and
take your time while removing the head, there's no rush and you
don't want to damage the head.
REST: This is pretty easy in that all you have to do is push the
head back on and it will slide over the arrowhead and once the
ends of the arrowhead pass through it is attached. If you are
using a custom head or a head from another line you may have to
do some modification on either these instructions of the head
you are using in order to reinstall it.
Final CommentsI hope that this article is of great use to customizers and the curious alike. I think it helps to appreciate the work that goes into these figures and the quality of construction and the overall durability of these toys. They are well made and built to last for many years of play from children of all ages, so this line will definitely be around for a long time.
If you have comments, suggestions and pictures that will help
make this easier to understand and more useful to collectors of
all skill level please send them along and the best comments will
be added (with due credit of course). Send them in to us at [email protected].
We'll look over them and the best information will be added to
future updates for this article to give people even more help
in their customizing efforts.
|