
Table of Contents
Introduction
Series I
Series II
Series III
Series IV
Interview with Product
"Famous Covers"
"First Appearances"
"Marvel Milestones"
"Avengers Assemble"
Designer Tom McCormack


|
Elbows and Knees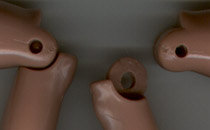
DESC: The elbows (below) and knees (above) are very similar to
each other and are simply cut joints. They allow about ninety
degrees of movement along them and have pins which hold the thigh
to the lower leg and the bicep area to the forearm. The pieces
on either side of these joints are ductile plastic and the upper
part (in both cases) has its joint surrounding the single part
from the lower. These pieces are thicker at the joint than the
same parts on the wrist, so while they will bend they don't bend
as easily nor as far. These joints are a bit harder to remove
and replace than the hands and feet.
REM: This is much the same as the hands and feet. Bend the joint
perpendicular to the natural orientation of it to create a small
gap. Place a small, flat screwdriver blade into the gap. Now use
it to work one end off of the peg and to slowly bend it outward.
Once you get the joint bent outward enough to get the peg loose,
remove the peg through the loop to the other side. I recommend
leaving the peg in the joint if possible.
REST: Again we replace these in a fashion close to that of the
hands and feet. Get one end of the peg properly seated (if it
isn't still there). Bend the other side away from it so that you
have enough room to slide the peg back through the loop in the
other piece of the joint. Once you get the peg through the forearm/lower
leg hole them bend the other side back and seat it on the peg.
Either by hand or with a pair of pliers (properly covered, of
course) you can squeeze the joint back to it's original shape.
There may be a very slight gap that remains from the removal,
but this shouldn't have an effect on the joint's integrity.
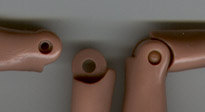
Thighs
DESC: The thighs are ball-jointed which gives them a full range
of motion along two planes that are perpendicular to each other.
This section will cover removing the thighs from these joints
but not removal of the ball joint parts themselves from the groin
area. That will get a section of its own following this one.
One thing that stands out about the thighs is that you would expect
there to be a large peg through them, when they have small pegs
that are identical to those of the elbows and knees. The thighs
have small plastic spacers (see below picture) that match the
color of the thighs and are on the ends of the small shaft that
runs across them. This gives a better appearance to the joints
and also makes them look more flush. It is a nice touch on the
part of Toy Biz. You cannot actually see the pegs that hold the
thigh on without removing the thighs. Another problem with these
is that the shaft is tapered in towards the center, so you can't
just push the spacers through the holes and get rid of them in
the center, once the peg is removed. Since the smaller hole is
in the center (right-most piece below) the spacers are difficult
to remove without drilling them out or cutting the thigh (as I
did).
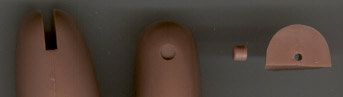
NOTE: The thighs are very difficult to remove and I haven't been
able to replace them as yet. I'll offer suggestions on replacing
them, but I haven't had any luck getting them back on. My advice
is to leave them where they are.
REM: These are very hard to remove. The method is much the same
as the tried and true hand/foot removal method. It is a lot harder
to accomplish here because you can't see the peg from the outside
and even though it uses ductile plastic on the thigh, it is a
lot thicker than hands or elbows and much harder to bend out of
the way. The pegs were damaged slightly (see picture) by this
removal. Bend the leg perpendicular to the flat of the joint holding
it on. It's a bit tricky because the joint rotates, but you need
to be able to get the blade of a small screwdriver in a gap. Once
in, you'll need to pry one end off of the peg. This is very hard
to do, so don't be discouraged. The best bet is to try and pry
it off the end and off of the joint if at all possible. If you
can get the thigh off, needle nose pliers can be used to remove
the peg from the thigh.
REST: If you are really serious about replacing these I have some
suggestions. I would remove the peg from the interior once you
get the thigh off. Then drill out the spacers for the shaft. Once
these are gone try and find a plastic or metal shaft that fits
the smaller diameter of the interior holes snugly and use it to
reattach the thigh. I cannot get the plastic bent enough to reattach
the thigh with its peg. Any help from others who have been successful
would be appreciated!
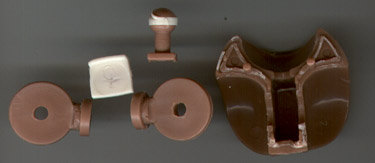
Groin Area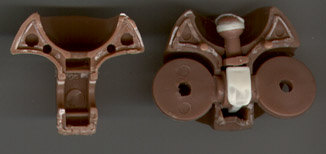
DESC: The groin area contains the joints that the thighs attach
to and one of the waist ball joints (it has two, which we'll examine
in the next section). The groin area is made up of two pieces
which are glued together, and the picture above has the front
piece on the left. The posterior piece (on right) has two small
pegs which stick into the anterior section for alignment while
gluing (see picture). Inside are the two pieces for the thighs.
These are large discs with small holes in the center (through
which the pegs go) with a flattened disc attached to one side
in a perpendicular alignment. Between the two parts is a small
rubber insert which keeps the joints tight and prevents any plastic-plastic
contact. Just above them in the interior is one of the waist ball
joints. It simply slides in a slot above the thigh joints and
pops into the waist ball above it. For more on this part, see
the next section.
Since this part is glued together, getting it apart is difficult.
I had to cut and pry mine apart and it will not go back together
again. It is shown here mostly for educational purposes and if
you get yours open I wish you the best of luck trying to restore
it.
REM: I cut along the bottom seam of the groin and eventually used
that gap to put a screwdriver blade in there and pried it open.
I was also cutting the front just above the thigh joints so if
I couldn't get it apart I could at least see the thigh mechanism.
The best bet here is to find a seam and try to pry the pieces
apart. It isn't easy and the chances of getting it back together
are slim to none.
REST: Use the picture as a guide to see how the internal components
go in. The thigh joints need to be wedged (with the rubber insert)
into their proper location. The waist ball joint can only go in
one way, so slide it in above the thigh joints in the slot provided.
Then take the two halves (assuming they are in good shape) and
glue them together using the two pegs as a guide. And be sure
not to get the glue on the parts that need to be free to move.
Good luck!
|