
Table of Contents
Introduction
Series I
Series II
Series III
Series IV
Interview with Product
"Famous Covers"
"First Appearances"
"Marvel Milestones"
"Avengers Assemble"
Designer Tom McCormack

By Rob Rooney

|
Toy Biz's Famous Covers (FC) line has generated plenty of positive interest, healthy sales and shows that a line based on comics characters alone can succeed in today's mass media oriented toy industry. But the secret to their success really isn't much of a secret - give the consumers what they want and add a dash of nostalgia. What the consumers have wanted were toys that could display well in their packaging and were highly articulated and scaled similarly to the fan favorite Mego lines from the 70's. While the new figures have a look that's similar, once you go under the surface you find a whole new and exciting world. The nostalgia keeps its place on the outside while inside Toy Biz has taken advantage of the advance of technology to make better toys. These aren't Megos of the 90's, but a whole new ballgame! The goal of this article is to benefit all FC enthusiasts, from the casual collector to the crazed customizer and everything in between. We'll be looking at a near-complete deconstruction of a FC Storm action figure to show the innovative designs, technical details and attention to detail and high standards that set this line apart.
Before we proceed, a word of caution. Please don't try this on
anyone else's figures without their permission and keep in mind
that the Storm I disassembled will never go back together again.
To follow all these steps will render much of your figure useless
except for parts and curiosity. And finally, follow any safety
procedures when you are using tools (like knives and even screwdrivers)
that can hurt you. And kids, get a parent to supervise so you
don't get hurt.
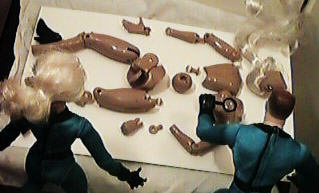
Looking at the picture probably reminds you of an archeological dig on the new species of action figure - 'famouseri coverasaurus', but it's just the sum total of the parts of a former Storm laid out for your (and Reed and Sue's) inspection. As you can see, there aren't any rubber or elastic bands as you would find in a Mego. And you'll also notice that some parts haven't been delicately removed. The reason for this is that these toys are very solidly constructed and take a lot of effort to take apart even if that's what you are trying to do! Probably the extent of part swapping and disassembly that most people will want to use with these figures is simply head and hand/feet swapping. The simple reason behind this is that these are not nearly as simple to take apart (nor to reassemble) as old Mego figures. I don't want to discourage the hardier breed of customizer, but you've been warned. It took many hours to get all the parts separate and also a good deal of cursing and cutting. Looking at the overall body in its exploded form you can see the full extent of the articulation which includes the following: hands and ankles that can twist and bend, ball jointed thighs, jointed knees and elbows, a modified ball jointed shoulder that approximates a ball joint with a shoulder/bicep twist, a waist that allows bending and twisting and the head that twists and bends on the female figures (like Barbie's head) and simply twists on the male figures (due to a larger neck). The male head is currently being redesigned to allow for more articulation, as revealed in the interview with Tom McCormack of Toy Biz. Counting each plane of motion as a point of articulation we arrive at an impressive figure of 25 points (2 for each ankle, wrist and thigh, 1 for each elbow and knee, 2 for the waist, 3 for each shoulder and 1 for the neck). In the American market, only the twelve inch GI Joe has more.
But don't worry if all this seems confusing at first, we'll go
into detail on each part and joint and discuss ways to remove
and replace the pieces (which should be of aid to customizers).
And if anyone out there has some improvements to the removal and
replacement suggestions, or any other comments please don't hesitate
to share them.

The FC body uses some standardized parts in several points. This is done to reduce manufacturing costs by limiting the number of total parts that need to be designed, and also make assembly less complex since workers will only have to familiarize themselves with a smaller number of parts. All the pieces are injection molded. There are at least two types of plastic used in the construction of these figures' bodies. One is very ductile (able to be bent and then returned to previous shape) and the other is stronger but more brittle. The softer, more ductile plastic is used for the arms and legs while the brittle type is used on pieces like the body, the waist ball and female characters' shoes. There is a third type that is softer than either of these and is used by the heads, but as far as I can tell that's all. One other material will be found inside the figures and that is a white rubber-like material. It's used to pad some of the joints and prevent actual plastic to plastic contact, which will increase the life of these toys and also shows Toy Biz's commitment to quality for these figures. The ductile type of plastic can be greatly deformed and return to the previous shape with little or no sign that it had been deformed. Even marks will fade from the surface. The brittle plastic will not deform much before you start to see stress marks and the plastic will turn very white. At that point you may break the part or have weakened it severely, so be careful. Also, some of the holes will have some extra plastic that may act to cover or obscure the joint. If you've ever built a model and had a part with a little extra plastic on a piece that had to be trimmed, you know what I mean. This extra may have to be trimmed in order to reassemble some joints. Just use an x-acto or model knife to carefully trim the excess out of the way. The extra plastic is usually quite thin and easy to remove.
Each section of the body will have a section below with pictures
to make things clear and removal and restoration suggestions for
customizers. REM will cover removal and REST will be restoration
steps, with DESC for descriptions of the parts and their construction.
To the Second Page which covers the little pegs, hands, feet, ankles and wrists. To the Third Page which covers elbows, knees, thighs and the groin area. To the Fourth Page which covers the waist ball, upper chest and shoulders.
To the Fifth Page which is the final page
with the neck, head and final comments.
|