
Table of Contents
Introduction
Series I
Series II
Series III
Series IV
Interview with Product
"Famous Covers"
"First Appearances"
"Marvel Milestones"
"Avengers Assemble"
Designer Tom McCormack


|
Waist Ball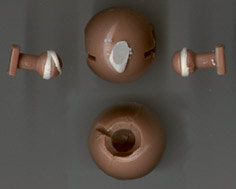
DESC: The waist ball is a small ball that fits between the upper
chest piece and the groin area. Both of these pieces are concave
so that the ball can fit in there and allow movement about it.
It allows complete rotation of the waist as well as tilting of
the upper chest area. The construction is very simple, consisting
of the ball and two ball and socket joints on opposite ends of
the ball. The ball parts of these joints are attached to the groin
area and the upper chest and consist of bulb shaped pieces (on
either side of the waist ball above). One interesting and unique
thing about these joints is that the bulbs have a thin ring of
rubber (sort of an 'o' ring) around them. I suspect this aids
in construction, but it also allows a small cushion in the joint
which reduces wear on the waist ball by preventing plastic-plastic
contact. It is yet another example of the quality in these figures.
(The white stuff on the upper waist ball is fun-tack that I used
to keep the ball from rolling.)
REM: Removing the waist ball from either part that it is attached
to (upper chest or groin area) only requires a screwdriver. Just
get the screwdriver blade into a gap and pry the ball off of either
piece. It is easier to get the blade of the screwdriver in between
along the back edge of the chest and groin area. Keep in mind
this may leave a small mark on the chest or groin area when removing
this. If you took the groin and chest area apart first then the
ball and socket joints may still be in place on the ball. To remove
these you'll simply need to grab each end securely and pull them
apart. Also one thing to note is that when I removed the bulbs
a small part of the rubber 'o' ring was torn off, so be careful.
If you decide you need to take this apart it may not be as nice
once you reassemble it.
REST: All you have to do is pop the bulbs back into their sockets
to get back to what you started with. You needn't worry about
the alignment of the ball as it can be twisted around the figure
for any orientation. It would be easiest to pop this back together
when the pieces on either side of the waist ball have been reassembled
(or were never disassembled).
Upper Chest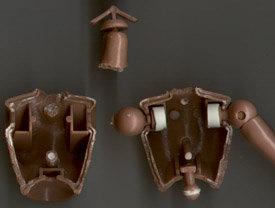
DESC: The upper chest consists of two pieces of brittle plastic
that have been glued together. In the above picture the back piece
is on the right and the chest is on the left. This was one of
the hardest pieces to open I ended up cutting a little to get
it open, so it won't go back together perfectly. I had to cut
the neck off of the figure before I could pry the chest open.
The two parts are glued around the edges and they have three pins
inside that glue together. Two of these are large and in the chest
area while the third is small and is in the neck. You can see
the large pin locations on the interior of the chest and back,
but the small peg in inside the neck and can't be seen. Also there
are three channels that are molded into the interior surfaces
of the chest that are used to hold the bulb for the connection
to the waist ball and the shoulder joints. The shoulder joints
will be covered in detail in the next section. It is fairly easy
to see where the various joints go inside the chest.
REM: I was forced to cut the neck completely away in order to
get enough leverage in there to crack open the two chest pieces.
I also cut along the edges of the pieces to try and loosen them
up. If you get the chest apart the odds aren't very good that
you'll get it back together. This part and the groin area are
the most likely pieces not to go back together again. Cut along
the edges of the piece and try to work something in to pry them
apart. I don't recommend taking this section apart, but if you
must that's how I did it. Don't try to use the shoulder joints
to pry it open because you can't remove the shoulders with this
together without breaking them. And even then I don't think it
would help.
REST: Good luck on this one. If you get it apart intact then you
need to glue it together the same way. Just try and use the pegs
to line it up and make sure the shoulders are in their proper
places while the bulb for the waist ball is in it's slot. If you
can get it apart and back together let the glue dry thoroughly
before you start to mess with the body again, just to be sure.
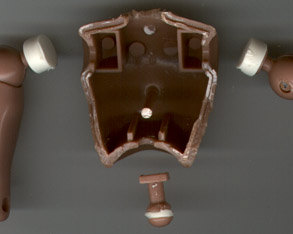
Shoulders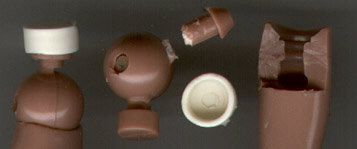
DESC: This is the most innovative part of the FC figure design
IMO. The shoulder design incorporates the ball jointed shoulder
you would expect with the added twist afforded by a bicep twist.
The result is that this joint has the equivalent of three points
of articulation in each shoulder and is one of the reasons this
series is so popular. Please note that the picture of this joint
shows that the joint is broken and one of the hemisphere's has
an arrow used to attach it to the bicep. Also, the shoulder piece
on the right shows a cut-away view of the slot where the arrow
attaches. This is similar to the same slots used in the wrists
and ankles.
The shoulder joint is the only joint that has any metal on the
FC figure bodies (you can see a glint of it on the second piece
from the left). I'm not sure if this piece will rust, but it is
covered with paint on the ends so that water shouldn't be able
to get on the metal parts, but you should still consider this
before you leave your figures in the tub for two weeks. The shoulder
consists of three parts - a metal pin, the chest connector and
the bicep connector (see picture). Each connector is a hemisphere
with a flange that sticks out and is used to connect it with the
parts on either side of it (the chest and bicep). Only the chest
connector has a hole drilled all the way through as the bicep
connector has what appears to be a covered hole on the outside
but is in reality just a tooling mark. The scratched off paint
in the picture below reveals the only metal in the FC body. Since
I haven't been able to get these two pieces apart I can only speculate
on the construction, but it appears that the metal rod is glued
into the bicep connector and then the chest connector is slid
over the rod to connect the two halves together and allow rotation
about that joint.
Each half them has a connector that goes into the body part it
is associated with. The disc shaped connection goes into the slots
in the chest and these are covered with a rubber cap when installed.
These rubber caps seem to have been glued onto the shoulder joints.
These caps pad the joint and extend its life by preventing plastic-plastic
contact and they also keep the joint tight. The bicep connector
has an arrow just like the wrist joints and is attached to the
bicep in the same fashion. In the side view you'll note that the
flanges for each hemisphere have cuts in them and overhang the
other half (look closely at the left-most piece). These parts
are made of brittle plastic and these are weak points and may
break with removal. I broke one of them and stressed the other
close to breaking, so keep this in mind if you really want to
remove the shoulder joints from the bicep (removal from the chest
is easy if the chest is open). I don't recommend removing the
shoulder joints from the bicep as they are very difficult to get
out and the chances of breaking the arrow while removing it are
extremely high.
REM: The shoulder cannot be removed from the chest without either
extensive cutting or opening of the chest cavity. It is best to
remove the shoulders after you have opened the chest per the previous
section. Removing the shoulder from the bicep is a bit harder.
If you can get pliers or another means of gripping the shoulder
joint tightly you should be able to yank it out if its socket
on the bicep. However the design of the joint makes this very
hard to do since the flanges are attached to the hemispheres with
a small notch in them which weakens them and makes them likely
to break. You can also cut the bicep around the arrow to remove
the shoulder, but this will damage the bicep piece. As far as
taking the two hemispheres apart you should try and get something
in the small gap between them and pry them apart. I haven't been
able to do it so far, but you may have better luck.
REST: For the chest piece simply put the rubber caps back on the
ends and place them in the small chambers in the chest cavity
and then glue the chest back together. For the bicep socket simply
press them into the socket as you would for a wrist joint to be
reattached. The weak points in the shoulder joint still exist,
so keep this in mind while pressing it into the socket.
|