
Table of Contents
Introduction
Series I
Series II
Series III
Series IV
Interview with Product
"Famous Covers"
"First Appearances"
"Marvel Milestones"
"Avengers Assemble"
Designer Tom McCormack
Custom Covers Creative Gallery

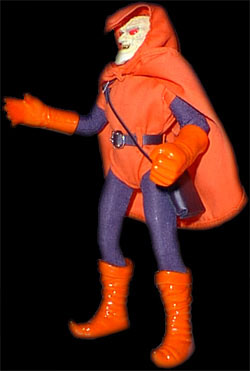
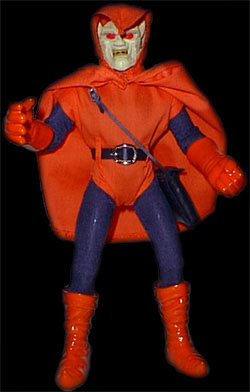
This recipe comes to us from Skipper McFarlane. He walks us through the process of making his fabulous custom Hobgoblin.
|
The Beginning:
1. One Famous Covers Green Goblin General: I started with a standard FC Green Goblin which I quickly stripped of all his clothes. I then made some sketches of the pattern based on the FC Green Goblin's suit. I can supply copies of the patterns, but I'm not sure how accurate they'll be ... I ended up modifying them a bit as I cut them. I also made the tunic 3 times before getting it to a point where I liked it! The Hobgoblin originally took the existing Green Goblin's stuff and dyed/modified it. I wanted to my Hobgoblin to feel like it had been modified from a Green Goblin as well. Therefore, I altered the head, but did NOT sculpt a new one from scratch!
I removed trailling part of the Green Goblin's hood. I knew the Hobgoblin's hood had something similar, but I felt that the Green Goblins extension would get in the way. The Hobgoblin wears a hooded cloak after all, not a long pointy hat! I also wanted the Hobgoblin's hood removable and out of fabric - I felt I could make the hood have the right shape without the support. I did!! Removing the trailling part from the Green Goblin's hood wasn't that hard as it simply is glued into a plug on his head (Like Thor's helmet!). I worked the trail back and forth until I loosened it enough to get a x-acto knife blade in and cut the little guy off. I then plugged the hole in the back of the Green Goblin's head with some Testor's contour putty. I also applied extra to various parts of the back side of the head to help even out the shape and remove the folds of the original hood. Next I began to shape the head. Using sandpaper and a dremmel, I worked slowly getting the head to a normal curvature for the back side (or as close as I could). You want to be careful as the head is hollow. There are areas (at the base of the ears for example) that are pretty thin. Amazingly, I was able to use the contour putty to fill in any accidental holes as they were pretty small. Since I felt the Hobgoblin had improved the Green Goblin's stuff a little, I gave him scalloped ears by using the dremmel to quickly remove and shape the scallops. The back edge of the ears are pretty solid and I didn't run into any thin areas resulting in holes here! I built up the eyebrow ridges, cheeks, and nose using contour putty as well. I wanted the eyes to be set back more so I brought out the ridges about twice what they were originally. The nose I felt was too short, so I extended it as well as building the cheekbones up. Finally, I lopped off part of the chin and built up the jawbones a bit to help make the face a little different in structure. After all, it may be an altered mask, but there's a different face under there!
I didn't like the smooth texture of the Green Goblin's face. Its fine for him, but I always thought it had some sort of texture. I took some of the contour putty, and mixed in a bit of rubber cement thinner as well as a little Liquitex Acrylics to thin it down a bit (Warning: It dries fast!). The acrylics were mixed to a light yellowish color and as the compound is white, it made the color even lighter. I then took an old brush and mushed it into the mixture. This cuased the bristles to spread out. I then dabbed the face and neck to build up a rough texture to the face. After all this had dried and I had a smoothness to the parts I liked (a little sanding here and there - or simply mushing it a bit with a finger while its still damp), I painted the head with an airbrush and more acrylics mixed to the color I wanted. Sorry, I don't remember the exact colors or mixtures, but I used white, yellows, orange, and brown in varying amounts. A tip about airbrushing ... keep the coats light. Do a gradual build up. Also, don't water the Liquitex acrylic too much as it reacts weird when applied! The Suit: Tip: After cutting your pieces of fabric, treat the edges with fabric glue (I water mine down a bit and apply with a brush). It gives it a bit more strength on the edges - I sew pretty close to the edges for the body suit ... should have given more space for the seams ... and keeps it from fraying when you work! It takes a while to dry, but its worth the time to stop a hassel! The body suit is made from a gray lycra. I used what normally would be the inside as it wasn't as shiny and had a more noticeable weave to it. Up close, it looks a little less like fabric and a little more like a metal mesh. The gray body suit is all one piece with two snaps in the back to hold it shut ... No Velcro here!! The orange tunic is made from a fabric similar to the purple tunic of the FC Green Goblin ... but has a few improvements. Again, there is no velcro to hold the back shut. Instead I use two snaps again. I stiched on four of the belt loops, two for the back, two for the front and gave him a slightly wider/larger shoulder cuffs than the FC Green Goblin had. The Cloak and Hood are all fabric. They're held together by a snap under the chin so it can be totally removed, or simply pulled back to reveal his whole head. They're composed of 3 pieces. 2 pieces make the hood ... its split down the center. 1 piece makes the cloak. The cloak itself got pleated as it was attached to the hood to help give it a little more body and build into it some natural folds.
The belt is made with the address tag from a suitcase! It was something I found at Goodwill one day - a great place to look for custom fodder! Anyway, I trimmed down the strap part to make it the width I wanted. It already had predrilled holes so that worked out well as did the length. I added the buckle I got from a craft/fabric store in the doll section and Presto! Instant belt. The material of the stuff worked well for trimming without fraying! I used the rest to make the satchel, but had to piece it so I'm looking for something else to remake it! The strap on the satchel has a buckle made from a piece of the alluminum can. I cut out a small piece, drilled two holes in it, held it with needlenose pliers and used a dremmel to shape the buckle and the holes. The Glider was modified with balsa wood, contour putty, and various spare parts off of toys (go to goodwill, not only do you sometimes find Mego stuff -I found a Batman and Thor's Hammer both for only .59 cents - but you can also find lots of good totally thrashed toys (I like to repair them .... ) that can be used for customs! And they're cheap!! I then spray painted it with a dark blue/black metalic paint! Finished!!!
|
 Well, as many of you know, the Hobgoblin came about after the death of
the Green Goblin. A mysterious person had stumbled upon one of the Green
Goblin's old hideouts and claimed the contents as his own! So with a
little repainting and dying, the Hobgoblin was born from the remains of the
Green Goblin! Well, that's the approach I took for my custom Hobgoblin!
Ingredients:
Well, as many of you know, the Hobgoblin came about after the death of
the Green Goblin. A mysterious person had stumbled upon one of the Green
Goblin's old hideouts and claimed the contents as his own! So with a
little repainting and dying, the Hobgoblin was born from the remains of the
Green Goblin! Well, that's the approach I took for my custom Hobgoblin!
Ingredients: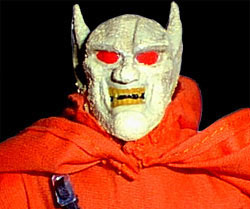 The Head:
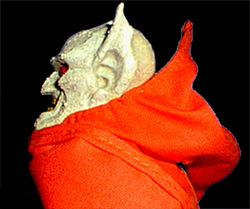 The teeth ... I thought Hobgoblin's teeth should have larger canines. I
went and carefully trimmed out the tops of the front teeth using an x-acto
knife. This made the raised areas of the teeth smaller in relation to the
canines. I only removed about 1/32 of the external molding of the teeth to
drop them back a bit and make them look shorter!
The teeth ... I thought Hobgoblin's teeth should have larger canines. I
went and carefully trimmed out the tops of the front teeth using an x-acto
knife. This made the raised areas of the teeth smaller in relation to the
canines. I only removed about 1/32 of the external molding of the teeth to
drop them back a bit and make them look shorter!
 The gloves and boots ... why that's where the Orange acrylic came in. A
few coats with the airbrush and voila! They were dry rather quickly, but
remained tacky for a few weeks. Even now they're a little tacky, but not
because they're wet. They don't have dust sticking to them, and they don't
leave bits of paint on my hands when I touch them. Some people have asked
if I've put any coating on them ... nope! They seem to be holding up fine.
I also didn't coat the head. If you're planning on some heavy playtime you
may want to. I'm not sure what to use so I'd appreciate any suggestions!
The gloves and boots ... why that's where the Orange acrylic came in. A
few coats with the airbrush and voila! They were dry rather quickly, but
remained tacky for a few weeks. Even now they're a little tacky, but not
because they're wet. They don't have dust sticking to them, and they don't
leave bits of paint on my hands when I touch them. Some people have asked
if I've put any coating on them ... nope! They seem to be holding up fine.
I also didn't coat the head. If you're planning on some heavy playtime you
may want to. I'm not sure what to use so I'd appreciate any suggestions!