Recipe prepared by chef DSTBoy. Click on any image to see a page with larger images.
Materials Used:
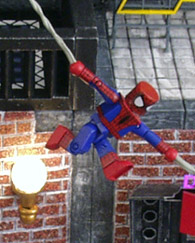
Marvel MiniMates (your choice)
Imaginext Rescue Center Playset (1)
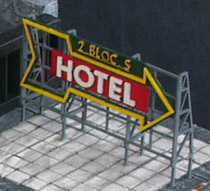
HO Scale Model Train "Hotel" Billboard (1)
HO Scale Model Train Neon "Diner" Sign (1)
HO Scale Model Train Traffic Light (1)
Foam Core (1 sheet)
Small Christmas Lights (2 bulbs)
Clear CD Jewel Case (1)
Cloth Scraps (2 different colors)
Nine-Volt Battery (1)
AAA Batteries (2)
Two Position ON/OFF Switch (2)
 Tools Used:
Dremel Tool
Exacto Knife
Krazy Glue
Squadron Putty
Various Colors of Acrylic Paint
Fine Grit Sandpaper
"Brick" Textured Spray Paint
"Granite" Textured Spray Paint
Flat Black Spray Paint
Grey Primer Spray Paint
Various Sizes of Modeler's Paintbrushes
Starting Out
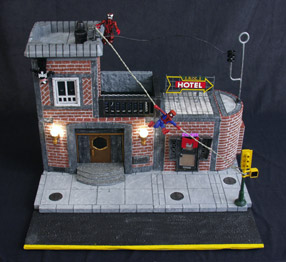
The first thing you need to decide when making a diorama/playset for your Marvel Minimates is what type of environment do you want to create? I chose an urban setting since it worked well with the characters I wanted to display. After you've chosen the setting, move onto size and layout. The great thing about using an Imaginext playset as a base is that it's modular, which means you can make, and therefore test out, several different layouts before starting your project. I had certain space requirements to work within when I made this display for the San Diego Comic-Con, and that dictated what the overall design would look like. The next decision to make is what type of "accessories" do you want in your scene. Working lights? Motorized objects? Opening doors? There are a variety of things that can be done to any diorama or playset that bring a little more life to it.
Beginning Construction
After I had all the planning done, I started off by making the diorama base. I cut a piece of foamcore that was the length and width of the space I had for my display. Since it was white, I used flat black spray paint to coat it. Because this was going to be a "street" scene, I then used a light coating of textured "granite" spray paint to give the street a used look. Then I put another coat of flat black spray paint over the textured coat. Finally, I dry brushed it with different shades gray acrylic paints. The yellow stripe on the edge, traffic lane divider, was a piece of masking tape that I put on it and then painted yellow. This makes for a nice "end point" to the scene.
 After finishing the base, I moved onto the sidewalk. I used the sidewalk pieces from the Imaginext playset. As luck would have it they fit perfectly into my allotted space, with only minor modifications requires. I removed the extra snap posts at the left and right ends of the sidewalk with a dremel tool, and filled in the snap holes with squadron putty. After the putty dried I used fine grit sandpaper to remove any excess and even out the bumps. Painting the sidewalk was very easy, I started with a base of dark gray acrylic paint, moved up to a lighter gray topcoat and finally dry-brushed the sidewalk with a very light gray acrylic. The manhole covers were painted with a flat black for the base and then dry-brushed with a dirty steel color paint to give them a weathered look.
Building Up
If you're using an Imaginext playset you'll need to glue the building pieces together to make a sturdy and durable diorama. I used Krazy glue since it works well on plastic and dries quickly. After I had the building framework assembled, I used a flat gray primer spray paint to coat it. Priming a large surface that you're going to paint with different colors is a good idea as it lets the other paints stick better and dry more evenly. Since I'm lazy and didn't want to paint all the brick parts of the building by hand I used some more textured spray paint, this time a texture that simulated the look of brick. Be aware that textured spray paint used on a plastic surface takes a long time to dry. Once the drying process was complete I used light gray paint and a fine tip modeler's paintbrush to paint in the spaces between the bricks.
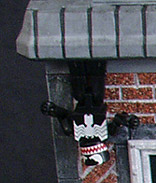
 The roof of the Kingpin's brownstone (left side building) was two different shades of gray with a black wash to give it that "dirty" look. The terrace rail was from the Imaginext playset and was painted flat black and then hit with silver highlights. I wanted the patio on the terrace to look ritzy since the Kingpin has loads of money (who says crime doesn't pay?) so I used gloss paints and made it look like it was done with fancy tile. The back wall of the terrace was made from for of the "beam" piece from the Imaginext kit, which I lumped squadron putty onto and then painted in different shades of gray... one rock wall on the way! The roof of the diner was a black wash applied directly to the white Imaginext pieces.
Windows and Doors
Sure the Kingpin is a big ol' fatty, but did the doors to his brownstone really need to be wide enough to accommodate the Imaginext firetruck? Nope, so I blocked the opening off with a piece of foamcore, made some steps out of foamcore, added some trim pieces inside the archway and viola, I had a semi-fancy door for Wilson Fisk to use. To make the diner door, I took one of the doors from the Imaginext set and used my dremel tool to cutout the center "panels". I then cut out a piece of clear plastic from a cd jewel case and glued it to the back of the Imaginext door. This made the door look like it had a glass center. I then cut a piece of flimsy cardboard to be the same size as the door, drew some lines on it, and glued it behind the plastic from the cd jewel case, giving the illusion of horizontal blinds.
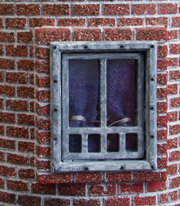 Both of the windows on the diorama are the Imaginext window frames. I glued the windows shut and then used squadron putty to fill in the games between the opening piece and the window frame. I painted the frames with a very light gray paint and then dry-brushed them with white paint, and finally hit the "nails" with black paint for a base and silver paint for a topcoat. Both windows have curtains in them. The curtains were made from scraps of cloth and some thread, and then glued in place.
Finishing Touches
To add some detail and make the diorama a little more interesting I decided to put some "action" points in. The traffic light is from an HO scale model train accessory set and is wired to an ON/OFF switch that's connected to a 9-volt battery that same switch and battery control the light on the Kingpin's brownstone, which were made from small Christmas tree lights stuck to the sconce bases from the Imaginext kit. The neon "diner" light is an HO scale model railroad accessory, which is wired to another ON/OFF switch and powered by 2 AAA batteries. The door frame and canopy for the diner came from an HO scale building kit, as did the antenna on top of the Kingpin's palace O' sin. The "Hotel" billboard was another HO scale train accessory... who knew model trains could be so useful?
Tips
- Wander around your local craft and hobby stores... you'll see lots of cools things to use and get some great ideas.
- Experiment with different painting techniques. Dry-brushing and washes can add whole new layers of detail.
- Lights, switches, motors, battery cases and the wiring needed to run them are easy to use and available for cheap at any Radio Shack.