
Guardians of the North
Created by Norbert Black ([email protected]).
Web site: http://www.brickshelf.com/cgi-bin/gallery.cgi?m=nhblack
Recipe
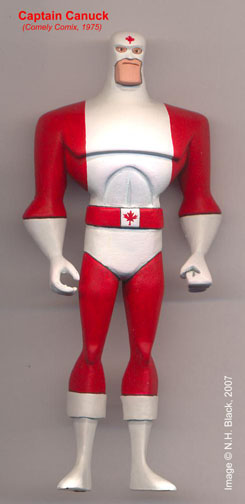
The donor figure was a thrift-shop find - a black, silver and green
Batman modeled on the second set of character designs from
"Batman: The Animated Series" - a Mattel figure?
Work began by removing evidence of all mold lines, using an exacto knife
and wet-and-dry sandpaper to get rid of ridges, and (where necessary)
Milliput epoxy putty to fill any depressions. In order to get a really
good finish, three cycles of sanding and filling were needed. Working
alternately with the wet-and-dry and the putty, irregularities were
smoothed away and small flaws filled in.
Once this was done, the metamorphosis from Batman to Captain Canuck
could begin, starting with the head. The cowl's "ears" were removed,
and the back and top of the head rounded off as well. The brow line was
carved back slightly to soften the figure's expression. The triangular
eye sockets were filled in with putty. The same material was used to
alter the line of the mask below the eyes, since Captain Canuck's mask
slopes down from the nose instead of up.
The cape was discarded, and the neck shortened to compensate. The neck
peg was filed down so that nearly all of the button on top was removed.
This lowered the head enough to make its position look natural. Putty
was then used to sculpt a new lower neck and to fill in the (now
superfluous) depression in the upper chest and shoulders.
Batman's utility belt and pouches were carved away, and a new belt and
buckle sculpted in putty. Putty was also used to create new
swashbuckler-style boot tops. Fortunately, no additions were necessary
to the gloves, but their scalloped trim had to be cut away and then
sanded smooth.
While examining the figure in this state, at became obvious that the arm
sockets were poorly placed. The right arm was 1.5mm too low, and the
left one was 0.5mm too far back. To get the best final result, lots
more putty and sandpaper work was going to be necessary. A decision was
made to work towards a maquette instead of an action figure.
The limbs needed fixing in place, since putty alone would not be enough
to immobilize their rubbery material. A 1mm diameter hole was drilled
through the top of each arm into the torso. A length of stout wire was
epoxied into both holes. This stopped the arms from moving. The same
locking procedure was then used on the legs. Putty and wet-and-dry
could now be used to fill the shoulder and pelvic joints and to reshape
the shoulders. Some additional work was necessary to bulk up the legs
at the rear, to avoid an excessive "step" where the figure's tights met
the bottom of his trunks.
The figure was now the right shape, so painting could begin. After a
clean-up using dish detergent, warm water and an old tooth brush, eight
thin coats of white acrylic craft paint were brushed on over three days.
A few irregularities were polished away with fine-grade wet-and-dry
after the final coat.
Using a fine brush, the borders between the red and white parts of the
costume were sketched in. Once all the lines were smooth and
symmetrical, the bulk of the red was blocked in with a larger brush.
Four thin coats of red were needed to get an even intensity of colour.
In order to suit the "animated" style of the figure, an attempt was made
to "shadow shade" the maquette. Light grey was mixed and sharp-edged
shadows were painted in under the chin, brow, the pectoral and abdominal
muscles, in the small of the back, below the boot cuffs and below the
belt. A darkish mid-grey was used to accent the finger joints. Dark
red was used to do similar accent work on the red areas of the costume.
To emphasize the joints, fine black lines were painted into the grooves
at top of the gloves and between the trunks and tights. The same thing
was done at the top of the boots, above and below the belt and around
the buckle. Note that only areas where two separate things met were
emphasized this way - there's no black line between the red and white
areas of the shirt, for instance.
At this point, a custom mix of white, yellow and red (with just a touch
of green) was mixed and then painted over the exposed skin of the chin
and around the eyes. The area under the chin was shaded with a darker
variation of the same colour, as were the parts of the eye sockets
shaded by the brow ridge.
A very dark brown line was used to separate the white mask from the
flesh tone. This slightly softer colour gives a better effect than
black in this case. Dark brown was used to sketch in the upper lids of
the eyes. The whites were then painted, followed by mid-brown irises
and black pupils. A bit of dark brown was added to the mouth, and the
face was complete.
The last task was to paint in the two maple leaf symbols. This was done
freehand, using a fine brush and well-thinned red paint. Once the shape
of the leaves was established, their colour was built up with a second
coat of red.
Back to the CustomCon entryBack to the CustomCon16 main page Back to Custom Central
[FAQs and Articles] [Custom Site Links]
[Custom Central Galleries] [Custom Talk]
|


