|
Hi. My name is Mike, but most
people around the customizing community might recognize my online persona of
minesurfer. My custom action figures debuted at
Custom Con 9 (Fall 2003) on Joe Acevedo’s page. They are the Legion of
Superheroes figures that had a submission on each day. Enough about me though…
Waisting Away
Have you ever looked at the Blink figure that was part of Toy Biz’s Marvel’s
Most Wanted line and thought, “This is a really nice female base figure, but
the legs look like she is suppressing the urge to relieve some bodily
pressures? I can’t use this.” If you have thought this or something close to
it, then this article is for you. I will be taking you through the steps I
used to join the torso from one figure to the legs of another figure.
The base figures you want to combine are important because they will dictate
what you have to create. What you want to do is try to choose at least one
figure that is already articulated at the waist. Hopefully the figures you
choose will have a “male” peg on the part that you want to use, so all you
have to do is create the “female” piece of the joint on the other figure. This
doesn’t have to be the case though as you can create male pegs with 2-part
epoxy clays and join just about any torso to any set of bipedal legs.
Unfortunately you won’t know what you have to work with until you get into the
cutting and dremelling. The thing you really need to pay attention to is where
you cut the torso that you intend to use. You want your custom to look
natural, so the lines of the torso should be an extension of the lines of the
legs or vice versa.
One other customizing skill you will need for this operation is disassembling
a figure. Here’s a brief overview of that process. Boil and pop the head. Use
a knife to cut the side and shoulder seams of the torso. Insert small needle
nose pliers in the neck hole and pry figure apart. See other articles and faqs
for more detailed descriptions.
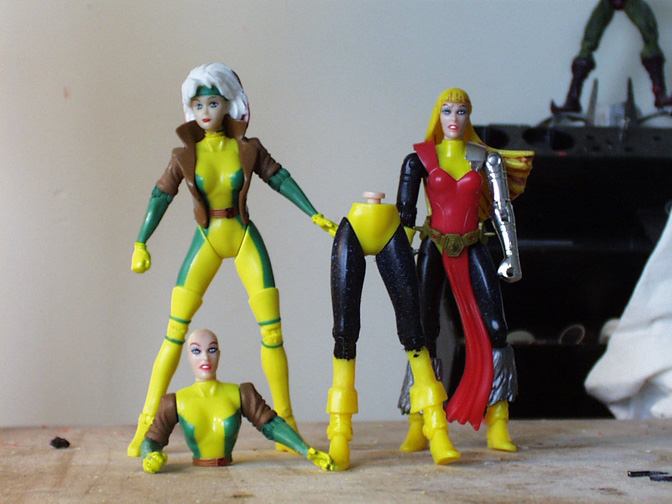
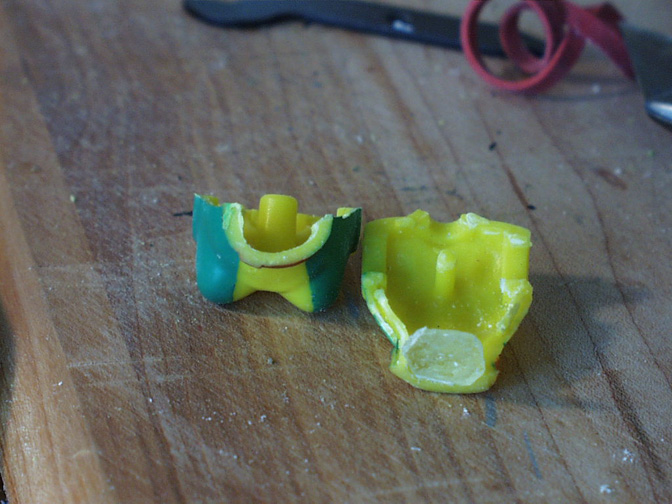
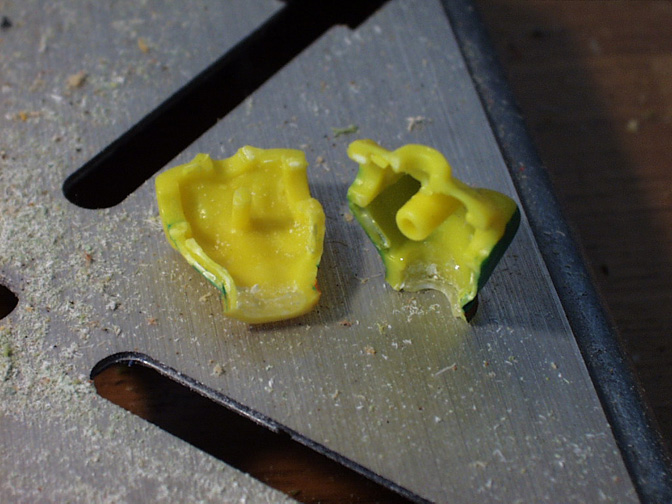
Like any other task, you have to start somewhere. Here you see the two figures
to be joined at the hips. I like the Magik figure because the torso unscrews
in the back for easy disassembly. What you’re left with is fairly generic,
booted legs with a “male” peg at the top. The Rogue figure is a decent torso
because it’s cheap, easy to crack open without major damage, and it’s
relatively simple to discard of unwanted details (jacket sleeves and glove
cuffs). Here you see two original figures in the background, and in the
foreground you see the pieces that I will fit together from each original
figure.
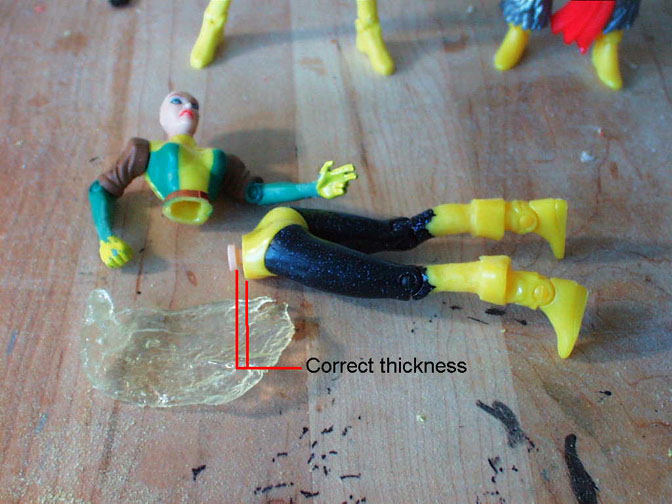
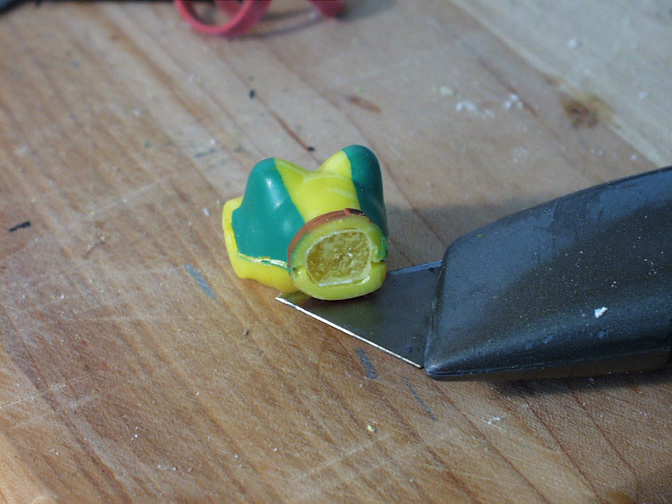
Find/make a piece of cured epoxy that is about the correct thickness. The
correct thickness is one that fits snugly between the horizontal piece of the
male peg and the lower abdomen area of the Magik figure.
A little bit about liquid epoxies
I don’t know why I don’t hear or read more about liquid epoxy as it pertains
to customizing. I’m sure other people are using it, but I just never hear
about it. Sure I’ve read where a lot of customizers use 2-part epoxy
clays/putties (Kneadatite, plumber’s epoxy, etc.) for sculpting and the like.
That’s not what I am talking about here. If you are not familiar with the
liquid epoxies, I highly recommend you become familiar with them. When I first
started customizing I was trying to combine pieces with super glue. Super glue
is by far the inferior product to epoxy when used for the purpose of combining
plastic pieces into one, stable, permanent unit. Try liquid epoxy for yourself
if you haven’t already. You can find it cheap (around $2 to $5 per package) at
Target, Wal-Mart, Meijer, Home Depot, Lowes, etc.
Now… I’m not technically savvy about epoxy, but from my experience it is two
relatively viscous liquids that when combined in the appropriate ratio
(usually a 1:1 which is easy to achieve because most epoxies come in dual
plunger packaging), create a chemical reaction that produces a hard,
plastic-like material. The great part about this is that it usually (depending
on the properties of the epoxy and what it is designed to stick or not stick
to) sticks to plastic and forms a bond that is as strong as the original
plastic, if not stronger. In my experience it is a little harder to cut with a
utility knife than most action figure pieces, but when it is cured it is
easily sandable for nice, smooth surfaces. It is not odorless though, but what
odor is present is not overpowering or unpleasant.
Now, there are all types of epoxies out there so you may have to experiment
with different types to find what works best for you. Some set in 90 seconds,
while others take over an hour. Some are a little runnier than others which
can make assembly a little tricky. You can find some epoxies that are strong
enough for construction purposes and others that are specifically designed for
marine usage/repairs. Always read the label before you purchase the epoxy to
make sure it applies to your use and time needs.
The one drawback to liquid epoxies, and it is a small one to me, is that when
you are mixing it, you will always have a little waste left over. That is the
nature of the dual plunger package, but that also leads to materials that can
be used for customizing. I usually just mix the liquid epoxy in the “bubble”
it was packaged in or if I want a bigger mixing space, I mix it in an action
figure’s bubble that has been separated from its card. Once the epoxy is
cured, you can just pop it from the “bubble” with pressure from below.
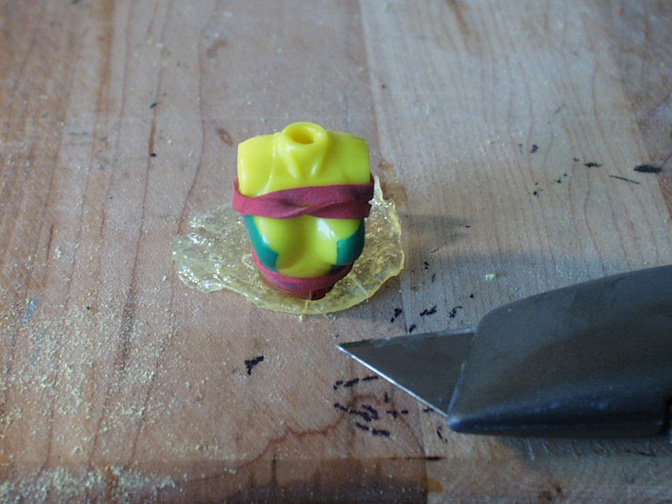
Cut the cured epoxy to the approximate shape needed with a utility knife. I
place the action figure piece on top of the epoxy and score the cut first
based on the rough outline of the piece. Exacto knives will work too, but
utility knives allow you to apply more pressure and will accomplish the task
better.
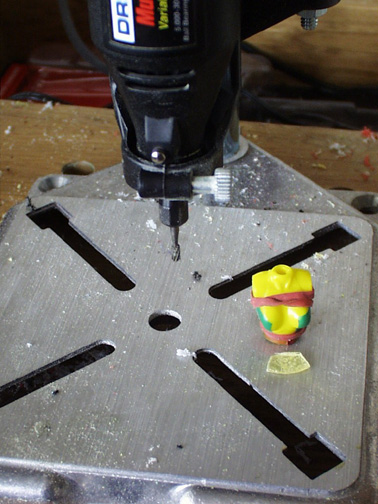
Once your cured epoxy is cut into a basic shape, you have to start the fine
tuning its shape with a dremel (or any appropriate rotary tool). I like the
metal cutting bits over the grinding, stone bits. The metal tips will have a
straight, smooth cutting surface that will leave a more refined edge on your
cured epoxy. Also the metal tip is better for drilling holes if you decide to
go that way later. Use what you feel comfortable with. I also recommend using
a dremel stand to hold your dremel. This will allow you to use both hands to
steady your piece and bring it to the tool instead of having to control both
the piece and the tool at the same time. I think I bought my stand at Home
Depot a few years back for about $50 and I haven’t regretted it once.
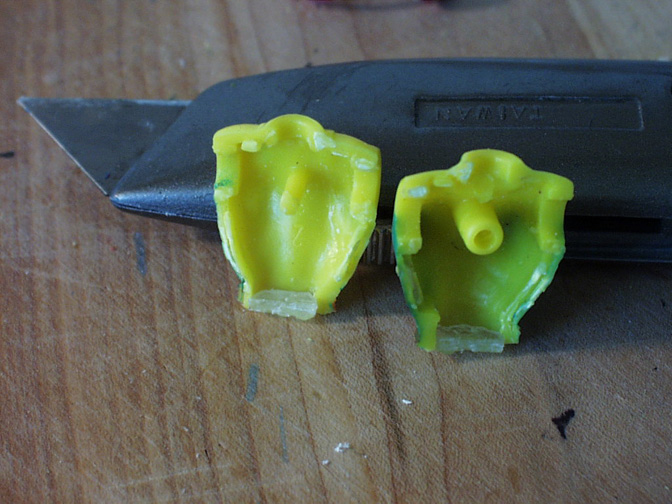
Continue refining the shape of the cured epoxy until it fits inside the torso
of the Rogue figure at the location where you want it to be. Be careful to
support and control the positioning of the epoxy near the dremel bit. If you
don’t have good control, the bit will send the cured epoxy flying.
Dry fit the cured epoxy to make sure that the torso actually closes with the
cured epoxy in place. Keep refining the shape until you are satisfied with the
fit and the closure of the torso.
Whip out the ole utility knife again and cut the cured epoxy to coincide with
the side seams of the torso. If you are so inclined, you could drill a hole in
the middle before you cut, but I still recommend shaping the hole after the
cut.
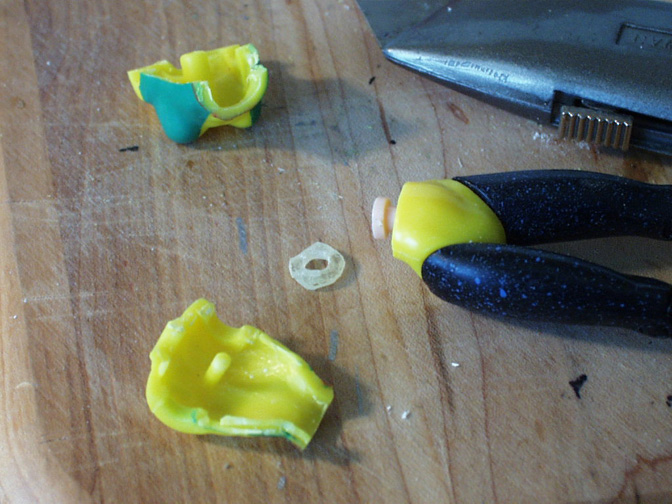
Back to the dremel… Shape the epoxy so that it fits the vertical shaft of the
male peg. <aside> Minds out of the gutters please. </aside>
Permanently affix the epoxy to the torso where you dry fit it before. I
recommend doing this with more epoxy. After the epoxy cures, you may have to
do some more fine-tuning with the dremel. This will be in order to make sure
the top of the male peg is not conflicting with the epoxy that you used to
join the original cured epoxy to the plastic torso. I tend to shape the epoxy
so that the peg fits around it, but I have, on occasion, modified a peg or two
to fit around the epoxy.
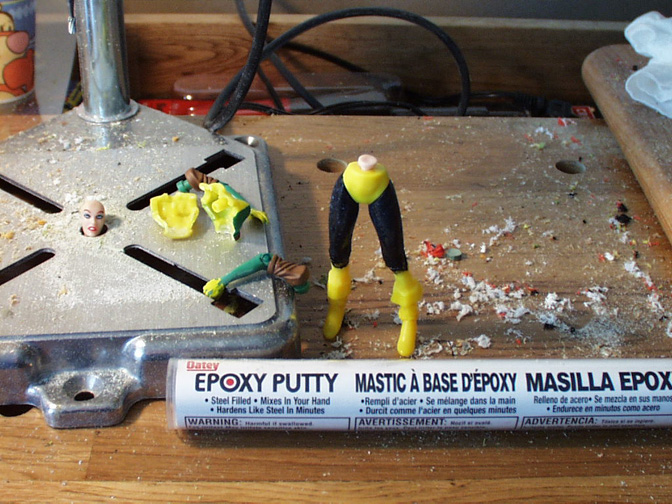
The final step is to reattach the two pieces of the torso. I have done this in
several ways. The cost effective way is to use liquid epoxy, but this is also
the messiest. Not only that but if the mess spreads beyond your control (or
notice), then you are likely going to loose some articulation. Recently I
picked up some liquid epoxy for marine purposes, and when you mix it, it does
not flow like regular liquid epoxies. I think I am going to start using the
marine epoxy for future assembly projects.
You can weld the pieces back together with a soldering iron, but this is going
to leave some clean up sanding and filing to do. Not to mention soldering
irons are hot and dangerous.
The easiest and safest way to join the figures back together is to put some
Kneadatite (or other two part epoxy putty) on the seams and let it cure. The
draw back to this method (for me anyway) is that epoxy clays like Kneadatite
can be expensive (usually around $12.00/tube) and hard to acquire. If you can
find a cheap, quick curing, two-part epoxy putty, then this is the way to go.
You can find the cheaper sculpting epoxies (seen here) in the plumbing
sections at Home Depot, Lowes, and other stores of that type; usually it costs
around $6.00 (US) for a tube. Don’t think that the plumber’s epoxy putty will
replace Kneadatite as an all around sculpting material though, as it has a
considerably less amount of curing time (anywhere from 2 to 20 minutes vs. 1
to 1.5 hrs for Kneadatite).
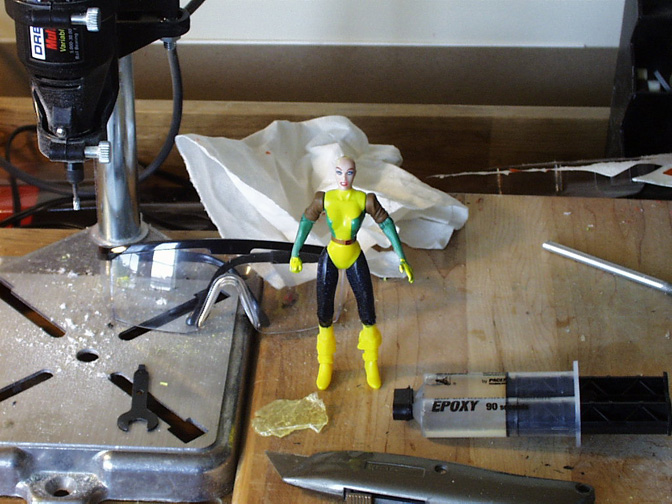
Here’s the finished product along with the tools and safety equipment you need
to make it happen. Here you can see the liquid epoxy in its dual plunger
package.
Public Safety Announcement: Always use safety glasses when operating dremels
during customizing activities. And when sanding, dust masks are a good thing
to wear too.
Now you can finish the rest of your custom.
Durability
So far I have used this technique or a variation of it on six figures and not
one of them has failed yet. Three of them will be on the web in the near
future, but you can see the other three customs in my Legion of Super-heroes
submissions in
Custom Con 9. (www.joeacevedo.com)
Supergirl (in Monday’s Legion submission), Umbra (in Wednesday’s Legion
submission), and Lightning Lord (in Friday’s Legion submission) were all put
together using this or a variation of this technique.
The process definitely has some durability when performed correctly. The first
custom I assembled using this technique was Umbra in the winter of 2002. Umbra
has fallen (the result of a domino effect started by other figures) from a
height of about 6 feet on more than three occasions. She has bounced off of
hardwood dressers on her way to the floor, with no damage to the joint. As
with most customs, I recommend light handling of the figure, but you don’t
have to be terribly gentle with it because of the waist joint. As long as the
materials you used are 2-part epoxies that were mixed in the correct ratios,
you shouldn’t have any strength problems.
Conclusion
This technique is not rocket science, and you may have to adjust it to fit
your needs. For example, if you are going to join a Marvel’s Most Wanted Blink
torso with the left over legs from the Rogue we just used, you will have to
make the female part of the joint for the Rogue legs because the Blink torso
has the male part of the joint. If neither piece has a male part then you can
make a peg out of kneadatite or some other two part epoxy clay material. The
good thing about this technique is if you are dissatisfied with the visual
results then you can cover the joint with belts (made from elastic) or fabric
skirts and still retain articulation. I don’t know about the applicability of
this technique to the Marvel Legends scale as I have not yet moved on from the
5” scale. I hesitate to speculate because I haven’t torn one of those figures
apart yet, but I would think that this technique should have some uses in
scales larger than the 5” scale.
Final Word: This technique will allow you to join the torso from just about
any figure with the legs from just about any other figure in a sturdy manner.
The technique itself is simple and uses strong, cheap, and readily available
materials to accomplish the intended goal.
Comments, questions, or suggestions will be appreciated, read, and/or answered
on the RTM forum, as I frequent the board often. If you feel the need to email
me, you can do so at [email protected].
Mike - minesurfer
|