Page not found
The requested page could not be found.
|
This step is where most collectors make their mistakes So let's get on with it, shall we...?
|
The first thing you want to do is make sure the card and blister are clean. Usually, just a damp cloth will remove most dirt and grime if applied gently. Now it's time to get rid of those pesky price tags! For starters, go out and get yourself a bottle of the greatest invention since sliced bread called... GOO GONE! You can find it at your local hardware store and costs about $4.00 for an 8 fluid ounce bottle. If used properly, the bottle should last you about 9 months or so. This amazing adhesive/stain remover will tackle any sticky mess, dries without a trace, and is environmentally safe... what more could one ask for? The process for applying Goo Gone is fairly simple. Just follow these easy steps: |
 |
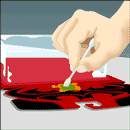
1. Lay the figure level on a flat surface (like a table, maybe?) with the price tag side up-facing you. Oh, and you might think about laying newspaper down as well. |
2. Take one end of a cotton swab and soak it with Goo Gone for a couple of seconds until saturated. Make sure you don't spill any on the carpet (see [c] below)! |
3. Apply the solvent generously to the price tag. Use enough so a small pool forms around the price tag, but doesn't run off the edge of the card. |
4. Let sit for 5-20 minutes. Because Goo Gone will evaporate relatively quickly, it is important to check the tag during this time and apply more solvent when necessary. So, keep an eye on it, buster |
5. Gently lift one corner of the tag and pull it towards the opposite corner. If the tag doesn't peel off easily, allow more sitting time and apply more solvent if necessary.
|
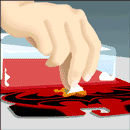
6. After the tag is removed, there may be some residual adhesive left behind. Hey, not a problem! Just take the soaked cotton swab and gently scrub the residue in a circular motion until gone. |
 |
7. Gently wipe up the excess solvent with a tissue and let dry. Presto... no more price tag! Now that was easy... wasn't it? Although Goo Gone is a great ally in the battle against card damage from price tags, there are a few things you should know before you get started:
|
I found this out the hard way after doing step #6 on a POTF-2 Ben Kenobi 12-incher (from Kenner). Imagine my reaction when I noticed the swab tip had suddenly become a purplish-black color... oops!
|
The "Future" of Bubbles: But as always, one must use caution when applying this method. The long-term effects of Future has not been determined as of yet. The most recent application has lasted 2 years without harm to the bubble, so far. Tip courtesy of: Darrell Herman |
Pristine Plastic | Keeping Track | Loose Figures | Display Cases & Shells |