Page not found | Raving Toy Maniac

Page not found

The requested page could not be found.


- THE PACK-MAN COMETH -

Version 1.0


Here's a subject I strongly believe in if you want to keep those figures
and toys looking like the day you bought them! Over the years I've moved
my toys many times, and through my method of packing, my toys show
very little wear from these treks across the country.

How is this possible, you ask? Because I try to pack them better
than the toy manufactures themselves! No dainty tissue paper here.
Nope, we're talkin' cardboard re-enforcement and styrofoam peanuts!

So enough jabberin', let's take a peak at
this reliable and affordable technique:


CAUTION:
This method is for temporary storage only ! As Brian Smith pointed out, "Newspaper contains a great deal of acid that over time (and even in the shorterm) causes damage both to the card, the bubble, and even to loose figures themselves"... so, it's probably a good idea to keep that in mind.

SUPPLIES YOU'LL NEED


Boxes: The good and sturdy kind. Try to use ones that are roughly the same sizes.
U-Haul boxes are great and are also affordable to most collectors. On the average,
the cost of these boxes are:
Small - $1.70 ea.
Medium - $2.35 ea.
Large - $3.15 ea.
 
Newspaper: I'm sure you can pull your resources together to find this stuff. If
you happen to have a new puppy, there should be plenty of it around the house!
 
Styrofoam Peanuts: Any U-Hual outlet is your best bet for finding this packing
material and the cost ranges from $2.99 to $10.99 depending on what size bag you
buy. But stay away from the bio-degradable kind! They tend to harden if it is
exposed to moisture and then allowed to dry.
 
Packing Tape: Obtainable from just about any retail discount store (i.e. Wal-Mart,
K-Mart, etc.).

1. Start with sturdy boxes that are tall enough for the items you want to pack.


2. Also pick boxes about
the same size in relation
to each other for stacking
later.


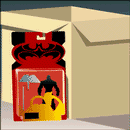
3. For carded figures,
begin by stacking two
figures face to face in a
"two-pack" fassion to get
more of a solid structure
per unit, like so.

4. For boxed figures or
accessories with odd
shapes, place them so
your end result is that
of a square shape.


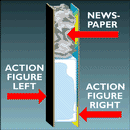
5. Lay a box on it's side.
Then place one of the now
"two-pack" figures flush
within one of the corners
of the box. Now stack them
up accordingly and repeat
for the other side.

6. If the figures aren't
flush with the box at the
top of the stack, just place
a piece of cardboard at each
end until reasonably tight.


7. But wait, now there's a
gap between the two
stacks! Don't panic! Simply fill in the gap with other figures or wadded up newspaper.

8. The box should now
have sort of a solid feel to
it and doesn't shift the
figures when the box is
pressed slightly inwards
at the corners.

9. If the figures are the
kind that have the blister
mounted on the lower left
or right side, stuff wadded
newspaper inbetween the
space of the two cards.

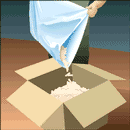
10. Now pour styrofoam
peanuts over into the box
until level with the top of
the cards. Tap or shake
the box to make sure the
peanuts settle between
all of the tiny gaps.

11. Most of the time your
boxes will be taller than
the cards. In this situation,
just place more "2-packs"
face-down on top of the
already packed figures.

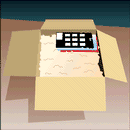
12. Pour more styrofoam
peanuts over the top until
level with the top of the
box.


13. Now close the flaps of
the box and use a small
piece of tape to hold the
top flaps firmly together.

14. The final step is to
tape the seam at least three
times with the packing tape
of your choosing.

--------------------
DO NOT USE
MASKING TAPE
TO SEAL
YOUR BOXES !
--------------------

IT WILL DRY-OUT AND BECOME BRITTLE OVER TIME, THUS LOOSENING THE SEAL


Pristine Plastic | Keeping Track | Loose Figures | Display Cases & Shells

Packing | Storage

Back to the Beginner's Guide To Collecting Action Figures

[Home] [News] [Forum] [Features] [Columns] [Archives] [Custom] [Newsletter]
[Shop Center] [Chat] [Resources] [Contact] [Sitemap] [Privacy] [Toy Shows] [Links]