|
Creating a Two-part
Plaster Mold
by Mike Yacullo
This article will show you how to make a two-part mold of an action
figure's head from plaster, and make a latex casting from the mold.
-
Note:
-
The same methods apply
to making a two-piece silicone mold to be used in resin castings.
This project came about because of Stingray's custom Michael Myers
figure. Since Michael's mask in the movie was made from a casting of William Shatner's
face, I thought it would be great to make the Michael figure a mask from a Captain Kirk
figure. Here's how to do it.
To follow along with this article, you will need:
- an action figure
- Super Sculpey or other clay
- Legos
- plaster of paris
- casting latex a.k.a. balloon latex
- petroleum jelly
- rubber bands
- baby powder
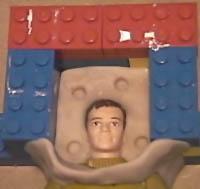 |
The head of your action figure should be sunk halfway
into a block of Sculpey. This will be the parting line of the two halves of your mold.
Depending on the figure, you may even be able to spot the parting line on the original,
and use that for reference. Don't just push it down into the clay, actually smooth the
clay right up to the figure; there should be no space between the clay and the figure.
Your should also make a few shallow indentations in the clay, to use as registration marks
for the two parts of the mold. I used a Lego guy's neck to do this. The next step is to build a mold box. This will define the size and
shape of your mold. I like to use Legos for mold boxes because they make it easy to build,
break down, and rebuild a box of any size. You will also need to build a wall of
Sculpey at the figure's neck area. Both the mold box and the Sculpey wall should be the
same height: about 1/2 inch taller than the highest point on your figure (in this case,
the tip of Kirk's nose).
Brush a thin coat of petroleum jelly onto any part
of the figure that will be inside the mold. This will keep the plaster from sticking to
your original. (I didn't have any petroleum jelly, so I used hand lotion and it worked
OK.) The plaster won't stick to the Sculpey, so just leave that alone. |
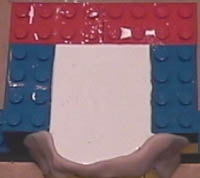 |
OK, now the fun part: pouring the plaster. I use plain
old hardware store plaster (it's much cheaper than art-store plaster). Mix it up according
to the directions, and make sure not to stir any air bubbles into it. While it's nice and
soupy, pour it into your box, starting in a corner. Shake or bang the box occasionally to
get any stray air bubbles out. Fill your box up to the top, and put it in a dry place to
cure. |
 |
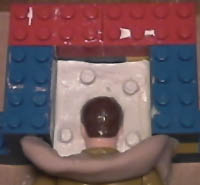
Now the hard part: waiting. Make sure
you wait until the plaster is totally cured before you remove the box and take the figure
out, otherwise you will end up breaking off parts of your mold. The plaster should be dry
to the touch. OK, now you can take apart your Legos and very carefully remove the figure.
Don't snap of the aligning pegs. You can see in the image to
the left where the plaster stuck to Kirk's neck; I must have missed a spot when I applied
the lotion. Don't do that! |
 |
Time for the second part of the mold. Now you're going
to have the first half of the mold where the Sculpey was before, and flip your figure over
to get the back of the head. You know the drill: mold box, retaining wall, petroleum
jelly. This time, you apply the petroleum jelly to the first
half of the mold as well. Make sure you get every surface of the mold. Every
surface, I tell you! Especially the top and sides of the aligning pegs. If any part of the second half sticks to the
first half, you will lose all your work (and Captain Kirk will have a plaster block for a
head from now on).
Also, apply petroleum jelly to the whole head of the figure (not
just the back). |
 |
Mix and pour the plaster the same way you did for the
first half. Wait until it's dry and very carefully ease the parts apart. Ta-daa! You've
got a two-part plaster mold! Good job! |
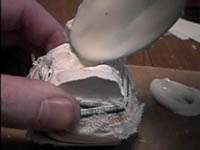 |
Put the two halves together and use a rubber band to
make sure they stay together. If you don't have a rubber band, and you're frantically
writing an article, tear up an old pair of underwear and use the elastic. Now to pour the latex. You should be using "casting" or
"balloon" latex, which is a very fluid form of latex. This is not
Mold Builder latex! (Although maybe that would work, I don't know...) You don't need a
mold release when pouring latex into plaster. Take a spoonful of latex and fill the mold
up to the top. Slosh it around in there, get all the air bubbles out, and pour the latex
out again. This will leave a thin coating of latex inside, which will dry and become a
mask. Of course, if you want a solid head of latex, don't pour anything back out. |
 |
Now put the mold in a warm, dry place and wait until
the latex is dry. For a hollow mask, this will be about an hour. A solid head could be
overnight or even a day. When you are ready to remove the casting from the mold, coat your
hands and the inside of the mold (if you're making a hollow casting) with baby powder.
This will help keep the latex from sticking to itself. Rock the two halves of the mold
back and forth to loosen the latex. Congratulations! You've
done it!
Send feedback or questions on this article to [email protected]
|
Back to Recipes and Articles |
Back to Custom Corner
|


