|
|

Decoupage is simply gluing paper patterns onto a surface
and sealing the surface and edges with glue. It can be used
for small, fine details that you either can't paint or would
rather not paint. Decoupage is perfect for applying logos,
chest symbols, decals, tattoos, or patterns onto customized
action figures.
Materials
- paper: not too stiff or thick
- scissors: preferably with a very sharp and
small pointy tip for detail work
- glue: Elmer's white glue or blue gel, or
diluted "tacky" glue
- paint brush: medium-sized with soft bristles;
not your favorite one
- computer: to download, scan, or draw your
decal (optional)
- color printer: ink-jet or laser (optional)
|
|
|
|
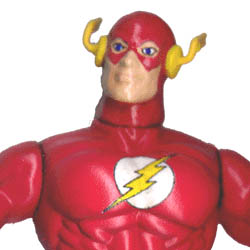
Conforms to figure's molded contours.
|
|
Process
1. Paint your figure as usual. Decoupage will be the last
step before sealing.
2. Create the symbol (or other item) that you would like
to apply to your figure. You can scan the item from source
material (like a comic book), download it from a fan web
site, or draw it yourself using pen and markers or your
favorite painting software.
3. Print out your work at the best resolution your
printer can manage. I usually end up printing several sizes
so that I can pick the one that is closest in scale to the
figure.
4. Cut out the symbol as perfectly as you can. I use
craft scissors made especially for fine, tiny cutting, which
I found in the craft/sewing section of Wal-Mart.
5. Dilute your glue just slightly with plain water and
brush a thin layer of glue on the entire back side of the
cut-out decal. Press the decal onto the figure; you'll have
a few seconds to adjust its placement. Don't worry about
glue squishing out from under it; you'll be going over the
edges with more glue anyway. Just don't let the decal dry
with any texture or bumps. Smooth the glue with your
dampened brush before it dries.
|
|
|
|
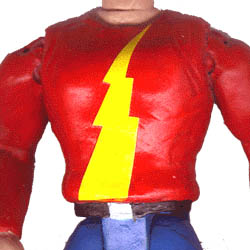
Is generally more precise than a
paintbrush.
|
|
6. Now that your decal is in place, use a damp cotton
swab to gently press the glue-wet paper into muscle grooves
and other details. The dampened paper fibers will stretch
just enough to conform to most details.
NOTE: Don't rub with the swab! If you do, you
might rub the ink off the paper or even cause little
rolled-up clumps of paper fiber to form. Yuck! Just press
straight down, dampening the swab as necessary to make the
paper become more malleable.
7. Let the decal dry a little; this will help it "set."
Then brush a thin layer of glue over the entire decal, going
over the edges and letting the glue pool a little against
the edges. The goal of true decoupage is to put so many
layers of glue that you can't feel the edge of the paper at
all when you run your finger over it. That's not really
necessary for our purposes, but I do recommend at least 2-3
layers of glue over the top of the decal to protect it and
to keep it from peeling up at the edges. Be sure to let the
glue dry between coats, and keep the glue thin as you brush
it on. You don't want brush tracks, lumps, or noticeable
edges.
8. When it's completely dry, I recommend that you
spray-seal your entire figure to keep dampness from
affecting the glue. The sealer will also conceal any
remaining differences between the sheen of your paint and
the sheen of the glue (which tends to dry dull). I use matte
acrylic sealer by Plaid.
|
|
|
|
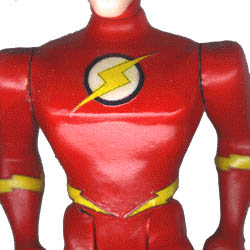
Is good for symbols, belts, and cuffs.
|
|
Below are some other helpful notes about the decoupage
technique.
Brush Maintenance
White and tacky glue washes out of brushes easily with
water if you rinse the brush before it dries. While you're
working with the decoupage (you generally can't stop to wash
your brush), put the brush in a cup of water to keep it from
drying out until you have time to rinse it thoroughly.
Sometimes even after a thorough rinsing you get a little
invisible residue left over, though, and then your brush
dries stiff or a little stuck together. So you will probably
want to use a cheapo brush that you don't mind ruining
and/or replacing if it gets gummed up. But don't get such a
cheapo brush that pieces of bristle break off or fall out;
that would obviously stick in the glue and ruin your
decoupage. Get a medium-sized brush with soft bristles. Or
use one of your older "good" brushes.
Optimal Conditions
I used decoupage for the lightning bolt bands around my
animated-style Flash's waist and arms, and it worked well.
However, I am not sure that decoupage would work as well for
the lightning bolt bands (or something similar) on a
realistic-style custom. It worked for the AS Wally mainly
because the arms & waist were very smooth. Also, the
smaller the paper decal is, the harder it is to work into
the muscle grooves and other details without tearing,
wrinkling, or distorting.
Good luck and happy customizing!
|
|
|
|
Article text copyright ©
Leslie Hancock, 1998. Please do not publish without express
written permission from the author. Thanks!
|
|
|
Back to Recipes and Articles |
Back to Custom Corner
|
|
All images, format, content, and design are copyright © 1994-2013 Raving Toy Maniac. No part of these pages may be reproduced without express written consent of the Raving Toy Maniac. Licensed character names and images are copyright © their respective companies.
|
|
|


